Conchfish AL 17.6T build

Mods and custom builds
kmorin
Donator 08, 09, 10, 11, 12, 13, 14, 15, 16, 17, 18, 19, 20, 21, 22, 23, 24
Posts: 1745
Joined: Mon Aug 18, 2008 1:37 am
15
Your location: Kenai, AK
Location: Kenai, Alaska

Re: Conchfish AL 17.6T build

#76

Post by kmorin »

Carl,
When its time to add the venturi-causing shield over the tunnel vent.... just use a small segment of pipe- has to be about 3" or maybe 4" dia. A sliver off one side that gives a 2" wide by 3-4" long parabolic leading edge w/ a flat trailing edge that about 1/2 covers the vent opening; will create enough low pressure to 'vent' the tunnel and you won't need to have a plate along the entire leading edge of the tunnel's transition to bottom panels.

Image

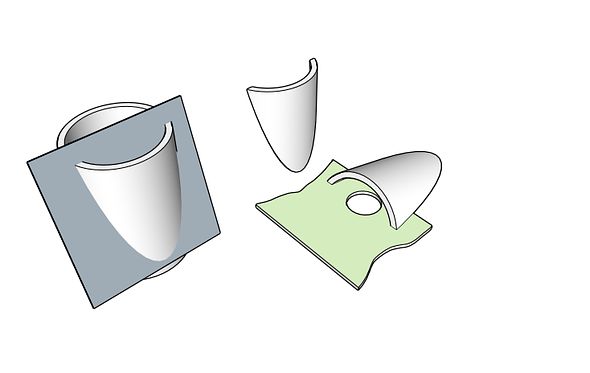
This pc would mount from CL of the vent pipe through-hull opening  (fore & aft) extending to a couple inches forward of the transverse tunnel weld seam along or covering a few inches of the keel seam.  All that is needed to avoid the pressure of the wake coming up in the vent is a shroud over the opening that will cavitate at speed and that forms a low pressure area from the bottom of the opening relative to the upper vent opening.

Looks like nice clean cuts, good quality uniform seams that provide nicely formed weld 'grooves'.  When welding this- either TIG or MIG, try to avoid the error of stopping or starting a weld bead within 1-1/2" of any corners.  The welds should start or stop away from corners in the photo shown, and the beads should wrap those corners while fully heated in the arc.  Corners are the sites of stress cracking if the welds are started or stopped on/in them.

Cheers,
Kevin Morin
Kenai, AK


Last edited by kmorin on Sat Apr 13, 2024 9:36 pm, edited 1 time in total.
Reason: add image link
kmorin
m32825
Posts: 57
Joined: Fri Jul 21, 2023 5:51 pm

Re: Conchfish AL 17.6T build

#77

Post by m32825 »

Kevin

Great solution, very elegant! Cutting shapes with CAD is like cutting them with a table saw, but with a lot less shavings. What software do you use for your drawings?

Part of me wonders if a vent cover is necessary at all. If the vent is open the suction in the tunnel is going to pull air through. Maybe less drag/turbulence when the vent is closed?

I'm working towards tacking in the keel longitudinal. You have this thing where daylight is in short supply during parts of the year, we have this thing where the temperatures you want to work in the garage are in short supply, and we're getting to that part of the year. You can rush in, do something real quick, then come out covered in a sheen of sweat. Cool/dry off, repeat...

-- Carl
kmorin
Donator 08, 09, 10, 11, 12, 13, 14, 15, 16, 17, 18, 19, 20, 21, 22, 23, 24
Posts: 1745
Joined: Mon Aug 18, 2008 1:37 am
15
Your location: Kenai, AK
Location: Kenai, Alaska

Re: Conchfish AL 17.6T build

#78

Post by kmorin »

Carl,
if an opening of a through hull is not shrouded to form a venturi (aft the shroud) then the pressure of the planing surface will 'pump'/push water up the through-hull on any planing boat's after half.  There is a relative positive pressure on the planing bearing surface as the boat's bottom is displacing water down, sideways (athwart ship) and forward to some degree.

These vectors of water displacement would force water up the vent through-hull fitting at the lead edge of the tunnel since there is a relative positive pressure compared to the open bilge (atmospheric pressure).  So the small narcel of a pipe segment or the original shelf of bottom overhang (that wouldn't weld very easily) are needed to create a low pressure (cavitation) area aft the obstruction in order to create a negative or low pressure relative to the bilge/atmospheric pressure so the ventilation through-hull will flow air downward into the tunnel.

Also, an open or 'not shrouded' pipe to hull intersection opening will generally pump upward due to the after edge of the opening acting as a 'scoop' to the water under the hull. SO... shrouds, covers, venturi causing forms are best practice to provide suction at a hull opening; when planing.

I'm not up to speed on outboard engine skiff tunnels so can't give any feedback on their necessary features or shapes; I'm operating on my experience with skiff hull drains, bilge vents and other openings in skiff bottoms and some power boats too.

The idea to convey in the above image, is that the only really important pressure differential is at the opening of the through-hull- not the rest of the tunnel's width in clear water, while planing.

I use SketchUP Pro for most of my illustrations as this software provides very easy to use (fast/few key strokes/little mouse action) graphics tools to create sketches/images that export to image file types that Photobucket will store and deliver via the Image "text link switch" in this Forum type host software.

Hope this helps answer your question about the narcel/shroud/cover of the vent? It's needed IMO. 

Carl, I hope you find some temp to work that's livable.... really hard to identify with being too hot to work!!

Cheers,
Kevin Morin
Kenai, AK


kmorin
User avatar
gandrfab
Posts: 595
Joined: Fri Mar 28, 2008 12:33 pm
16
Your location: Edgewater Fl
Location: Edgewater Fl

Re: Conchfish AL 17.6T build

#79

Post by gandrfab »

m32825
Posts: 57
Joined: Fri Jul 21, 2023 5:51 pm

Re: Conchfish AL 17.6T build

#80

Post by m32825 »

Kevin,

Vent cover concept. I know, I know, I'm getting distracted...but you started it!   

This is 2" pipe cut so the top is parallel with the bottom of the hull. I trimmed the leading end to match the hull plate thickness. There's going to be a keel bar on top of the hull plates, I could carry it back over the top of the vent cover.

    --- Carl
IMG_20240415_194230939_HDR_copy_1200x1594.jpg
IMG_20240415_194230939_HDR_copy_1200x1594.jpg (24.53 KiB) Viewed 287 times
 
IMG_20240415_194111589_HDR_copy_1200x1594.jpg
IMG_20240415_194111589_HDR_copy_1200x1594.jpg (29.1 KiB) Viewed 287 times
m32825
Posts: 57
Joined: Fri Jul 21, 2023 5:51 pm

Re: Conchfish AL 17.6T build

#81

Post by m32825 »

gandrfab,

That's a good setup. A hull mounted low water pickup is essential (and a jack plate, and a cupped prop, and a compression plate).

I did one on my last boat. You have to plug all the factory water intakes and drill/tap a hole in the lower unit to feed water to the pump. I'll mount my pickup at the trailing edge of the hull, off to one side of the tunnel. The video mentions the pickup being tunnel mounted but I don't see how that works if the vent is open and there's no water in the tunnel. Maybe it's at the front of the tunnel? Maybe they don't vent theirs? Any ideas?

-- Carl
User avatar
gandrfab
Posts: 595
Joined: Fri Mar 28, 2008 12:33 pm
16
Your location: Edgewater Fl
Location: Edgewater Fl

Re: Conchfish AL 17.6T build

#82

Post by gandrfab »

I haven't seen this system before. Easy access strainer. Still have to have concern with plugging the pick up, but that's a given with any raw water system. , looks easy enough make.
Zephyr Cove low water setup?
00.png
00.png (265.84 KiB) Viewed 276 times
 Seen here 
https://www.mbgforum.com/topic/13486-ze ... er-pickup/
 
User avatar
gandrfab
Posts: 595
Joined: Fri Mar 28, 2008 12:33 pm
16
Your location: Edgewater Fl
Location: Edgewater Fl

Re: Conchfish AL 17.6T build

#83

Post by gandrfab »

Guess this is what we see in the Youtube link I posted above.

https://www.youtube.com/watch?v=_OiTA99t-DA
m32825
Posts: 57
Joined: Fri Jul 21, 2023 5:51 pm

Re: Conchfish AL 17.6T build

#84

Post by m32825 »

gandrfab,

A fellow out of Texas makes the Zephyr Cove low-water pickup system and installs them on high-end flats skiffs. He has a good system and does nice work. I will do something similar for my boat.

I got the "skinny water recipe" from the Texans who fish the lower Laguna Madre area. They have huge areas that are shallow, 6" difference in running depth can open up a lot of territory. They run miles and miles in one foot of water. 

The YouTube video you linked to is for a builder in the Crystal River area, one of my favorites. Sounds like they have a pair of scoops picking up water inside the tunnel. I don't think they ever vent the tunnel, they are throwing enough horsepower at the problem that losing a few miles an hour of speed is not a big deal. I plan to run a 30 horsepower outboard to keep things late, and I'll take all the marginal speed increase I can get. I could be biased, but I like the lines of my hull better than theirs!

    -- Carl
​​​

 
m32825
Posts: 57
Joined: Fri Jul 21, 2023 5:51 pm

Re: Conchfish AL 17.6T build

#85

Post by m32825 »

The garage had a low of 68 and a high of 91 today. I figured out that I need to avoid the afternoon, when the setting sun shines directly on the garage doors, the radiant heat is brutal.
m32825
Posts: 57
Joined: Fri Jul 21, 2023 5:51 pm

Re: Conchfish AL 17.6T build

#86

Post by m32825 »

Keel longitudinal is tacked in place. I couldn't figure out how to tack it underneath, so I tacked it on the sides as far from the hull as possible. I figure it's going to come out way better than with no longitudinals in any event, so net improvement.

Working on placing the other two using the hull panel as an alignment guide. From astern, when the left edge of the hull panel is flush with the left side of the keel longitudinal, the right edge of the hull panel shows where the left edge of the other longitudinal should come to. 

There's a lot of "twisty force" going on up front, both in the outboard longitudinals and in the hull panel. Looks like I've still got a good fit at the bow.
IMG_20240419_083953752_copy_1200x2132.jpg
IMG_20240419_083953752_copy_1200x2132.jpg (32.73 KiB) Viewed 201 times
 
IMG_20240419_084025217_copy_1200x2132.jpg
IMG_20240419_084025217_copy_1200x2132.jpg (31.78 KiB) Viewed 201 times
 
m32825
Posts: 57
Joined: Fri Jul 21, 2023 5:51 pm

Re: Conchfish AL 17.6T build

#87

Post by m32825 »

Got tied up a little this weekend, still working on aligning the first off center longitudinal. It's a real 3D problem solving exercise, but making progress. Worked on taming some of the twisty forces. Broke out the two foot crescent wrench to twist the longitudinal into submission. Modified a few vise grips to grip the frame better, they definitely came with extra parts...
IMG_20240421_202535803_copy_1200x2132.jpg
IMG_20240421_202535803_copy_1200x2132.jpg (43.61 KiB) Viewed 174 times
 
IMG_20240421_201923978_copy_1200x675~2.jpg
IMG_20240421_201923978_copy_1200x675~2.jpg (43.06 KiB) Viewed 174 times
 
m32825
Posts: 57
Joined: Fri Jul 21, 2023 5:51 pm

Re: Conchfish AL 17.6T build

#88

Post by m32825 »

I can see that I need to improve my TIG welding skills so I signed up for a self paced aluminum class:

www.pacificarctigwelding.com/store

It will slow me down near term, but improve the quality of the outcome.
 
 
kmorin
Donator 08, 09, 10, 11, 12, 13, 14, 15, 16, 17, 18, 19, 20, 21, 22, 23, 24
Posts: 1745
Joined: Mon Aug 18, 2008 1:37 am
15
Your location: Kenai, AK
Location: Kenai, Alaska

Re: Conchfish AL 17.6T build

#89

Post by kmorin »

Carl,
In all welded aluminum boats there's a part/panel end or corner that doesn't lend itself to MIG. The MIG arc/weld power comes from the weld vaporizing the fed wire- no wire- no weld. SO to get any MIG weld you have to be feeding wire into the puddle/arc/weld.

However, there are many places where several parts of out boats come together and need to be welded. That is where TIG is worth the work to learn and use. With TIG the arc stays controllable and constant while filler is added OR NOT as you choose ..... due to the circumstances of the weld joint at any give point in the bead/seam.

So MIG welding thick to thin, or ends of bars to bulkheads or many other places where scantlings meet.... TIG is much more realistic since you can keep the arc going, melting metal and maintaining a puddle or molten metal w/out adding filler wire. With MIG the wire has to be fed to get an arc even when you don't need or want a increase in the molten puddle volume.

So control of the weld where the parent metal is not uniform or 'controlled' is where TIG really lends to a better boat build.

The best exercise for new/improving/novice TIG welders is to spend hours (no exaggeration) feeding filler in the off hand. The lack of doing this exercise is what limits 95% of new TIG welders. If you can't feed steady you can't weld w TIG.  Regardless of which method of filler feeding you learn or choose, practice it w/o the welder or hood for hours to get your arm, forearm and hand to do the movement repeatedly and consistently.  W/O that- there's no TIG.

I use a motorized TIG gun to feed the wire so I've got an electric motor w speed control to feed filler... and its very helpful for an old geezer to get decent welds.

Cheers,
Kevin Morin
Kenai, AK.
kmorin
m32825
Posts: 57
Joined: Fri Jul 21, 2023 5:51 pm

Re: Conchfish AL 17.6T build

#90

Post by m32825 »

Kevin,

As always, I appreciate the context and perspective your comments provide. I can definitely see the usefulness of TIG for a couple areas already. My biggest fear is that my execution skills will not do your excellent advice justice. I need to spend time focused on learning. As you know I am eminently distractible, the course work will give me some much needed structure. The alternative is to just wing it and not be happy with the results.

I will give rod feeding extra emphasis.

-- Carl
User avatar
gandrfab
Posts: 595
Joined: Fri Mar 28, 2008 12:33 pm
16
Your location: Edgewater Fl
Location: Edgewater Fl

Re: Conchfish AL 17.6T build

#91

Post by gandrfab »

Where are you in Central Florida?
I'm in Edgewater a hop and a skip South of Daytona beach, for reference.
If you don't mind I'd like to check your project out.
m32825
Posts: 57
Joined: Fri Jul 21, 2023 5:51 pm

Re: Conchfish AL 17.6T build

#92

Post by m32825 »

gandrfab wrote: Wed Apr 24, 2024 5:25 am Where are you in Central Florida?
I'm in Edgewater a hop and a skip South of Daytona beach, for reference.
If you don't mind I'd like to check your project out.

 
Sounds good, PM'd you contact info.
User avatar
gandrfab
Posts: 595
Joined: Fri Mar 28, 2008 12:33 pm
16
Your location: Edgewater Fl
Location: Edgewater Fl

Re: Conchfish AL 17.6T build

#93

Post by gandrfab »

Nice to meet you, looks like you got it going in the right direction.
Plenty of room for the task on hand.  :thumbsup:
 
AABConchfishbuild.png
AABConchfishbuild.png (364.89 KiB) Viewed 44 times


Post Reply Previous topicNext topic